The Visual Guide to
Bovine Reproduction
- Normal Calving
- Multiple Births
- Calving Facilities
- Pelvic Dimensions
- Calving Problems
- True Breech
- Sizing the Fetus
- Calving Injuries
- Cesarean Section
- Fetotomy
- Pelvic Splitting
- Episiotomy
Obstetrics: Calving Injuries
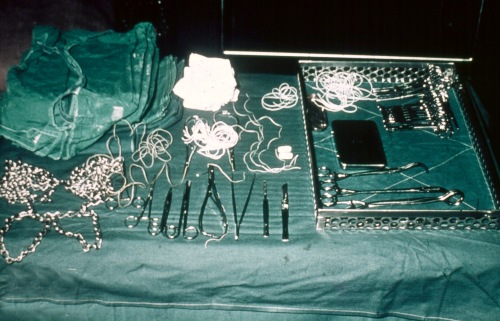
Instruments for C-section.
In addition to a standard selection of sterile surgical instruments for abdominal surgery, 2 obstetrical chains, 2 cervical forceps, and straight atraumatic needles are needed.
Utrecht (1975)
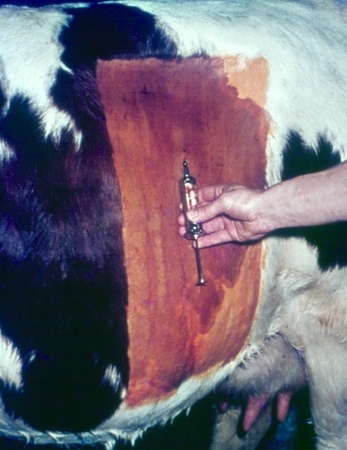
Local Skin Block.
After sterile preparation of the surgical site the incision line is infiltrated with 2% Lidocaine, subcutaneously.
Utrecht (1975)
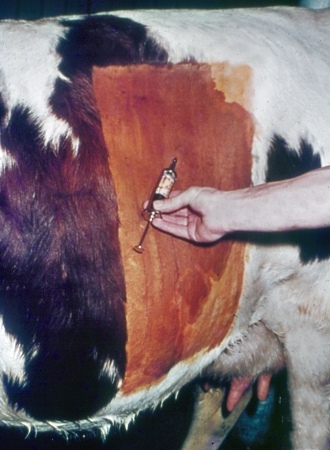
Subcutaneous Anesthesia.
After the subcutaneous infiltration of the incision line the deeper muscle layers and the retro-peritoneal space are injected with the local anesthetic agent.
Utrecht (1975)
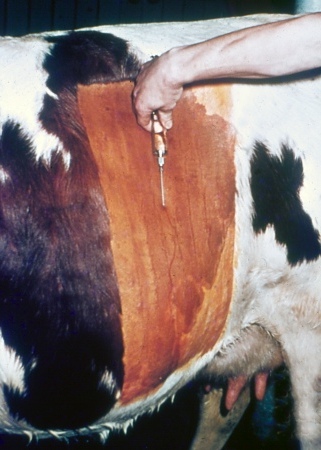
Anesthesia of the Deeper Layers.
After the subcutaneous infiltration of the incision line the deeper muscle layers and the retro-peritoneal space are injected with the local anesthetic agent.
Utrecht (1975)
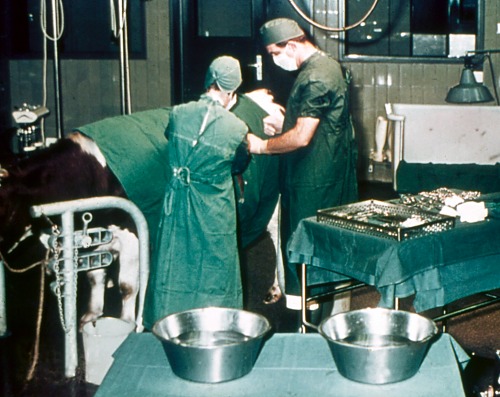
Set up for Cesarean Section.
After opening the sterile pack of surgical supplies and draping the cow, the patient is ready for a standing cesarean section via the left flank.
Utrecht (1975)
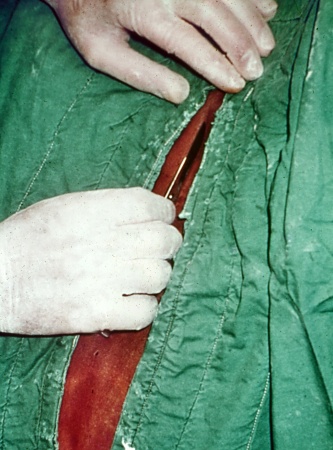
External Abdominal Oblique Muscle Incision.
The external abdominal oblique muscle has been incised.
Utrecht (1975)
Internal Abdominal Oblique Muscle Incision.
The internal abdominal oblique muscle has been bluntly dissected.
Utrecht (1975)

Transversus Abdominis Muscle Incision.
Blunt dissection of the transverse abdominal muscle by vertically dividing it with the fingers.
Utrecht (1975)
Lifting up the Peritoneum.
The thin peritoneum is lifted up and a small incision is made to allow the introduction of two fingers.
Utrecht (1975)
Locating a Leg of the Calf.
Two fingers are inserted into the small incision in the peritoneal cavity and the peritoneal incision is extended.
Utrecht (1975)
Positioning the Hind Leg in the Incision.
When the calf is in anterior presentation a hindlimb is lifted into the incision by placing one hand under the hock first and then directing the bent claw through the top part of the incision. Frequently this is the most difficult maneuver of the entire operation due to a tight uterine wall. Tocolytic drugs such as Clenbuterol can be of help but are currently illegal in the USA.
Utrecht (1976)
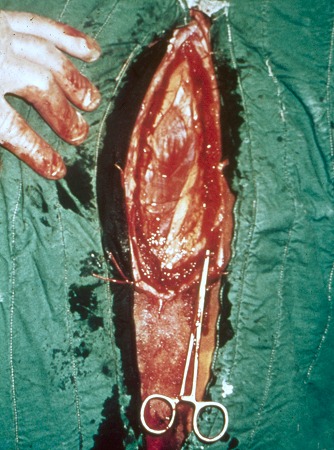
Incision in the Uterus.
A liberal full-thickness incision is made through the uterine wall over the exposed leg. Ideally, the incision should be made along the greater curvature near the middle of the horn. Placentomes should be avoided.
Utrecht (1976)
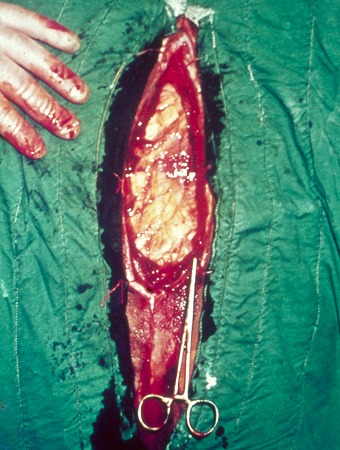
Leg Exteriorized.
Once the uterine incision has been made the leg generally pops out. The membranes can be nicked between the claw and bluntly torn the remainder of the way to expose the leg.
Utrecht (1976)
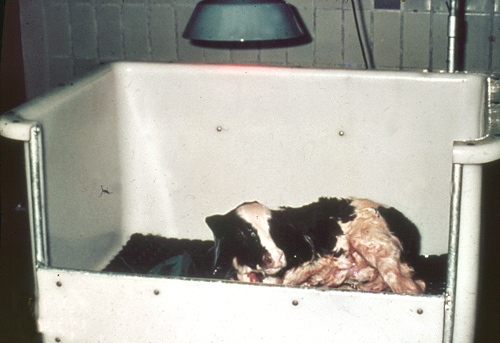
Newborn Calf in Clean Cart after C-section.
It is imperative to immediately make sure that the calf is breathing. It is then advisable to deliver the calf into a clean "container" or onto a clean surface.
Utrecht (1976)
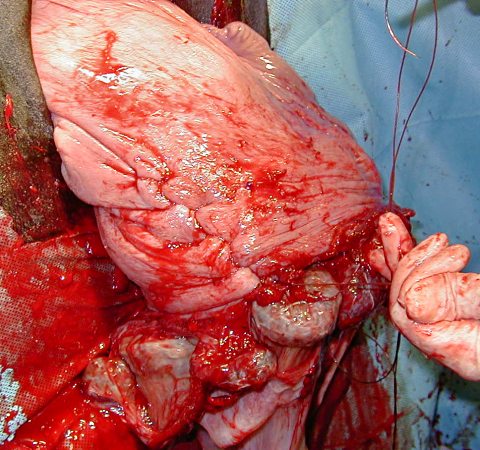
Uterus Ready for Closure.
After delivery of the calf, excessive amniotic membrane is trimmed off, and the placentomes are returned to the lumen of the uterus. The uterus is now ready for closure.
Utrecht (1976)
Placement of the Needle.
Simultaneous closure of the cut edges of the incision and infolding of the outside wall of the uterus.
Utrecht (1975)
Uterine Closure in Progress.
Simultaneous closure of the cut edges of the incision and infolding of the outside wall of the uterus.
Utrecht (1975)
Uterine Closure Complete.
Closure complete. The cut edges of the incision have been aligned and the incision line has been inverted to seal it. There is no exposure of the suture material which could lead to adhesions.
Utrecht (1975)
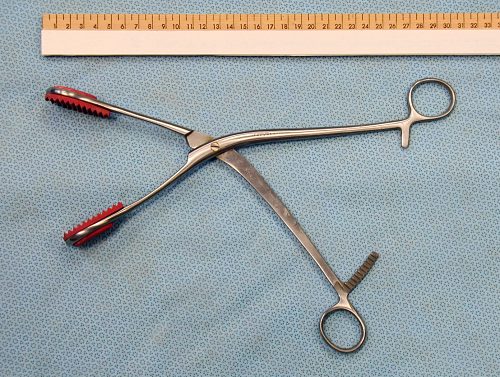
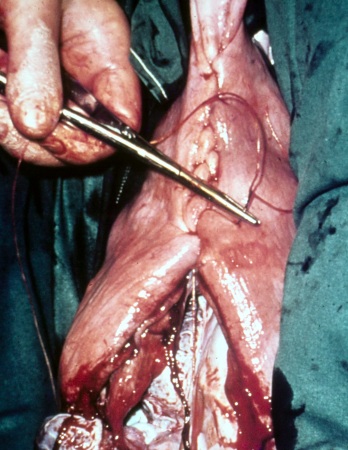
Uterine Forceps.
Rubber shod jaws of a uterine forceps to minimize trauma to the uterus during the process of suturing. The uterine incision is positioned with the aid of a uterine forceps at each commissure of the incision which are held by an assistant.
Drost M (2009)
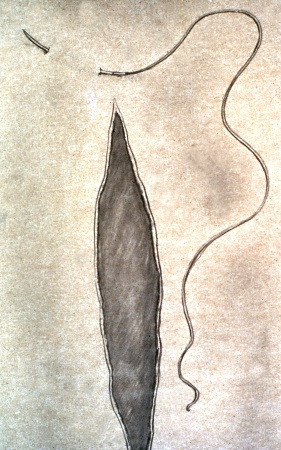
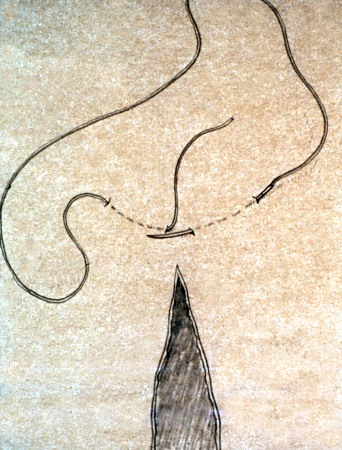
Utrecht Pattern - First Stitch.
The Utrecht pattern for uterine closure is a modified Cushing pattern, a continuous infolding pattern whereby the individual stitches are placed diagonally rather than parallel to the line of incision. The first stitch is placed just above the (dorsal) commissure, at the apex of an inverted, obtuse triangle.
Utrecht (1976)
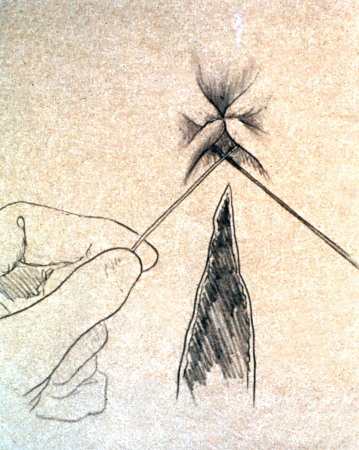
Utrecht Pattern - First Knot.
The second bite returns to the apex of the triangle.
Utrecht (1976)
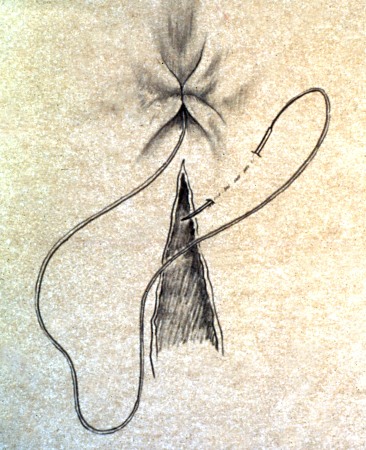
Utrecht Pattern - First Tie.
As the ends of the suture are pulled tight, the base of the triangle folds in.
Utrecht (1976)
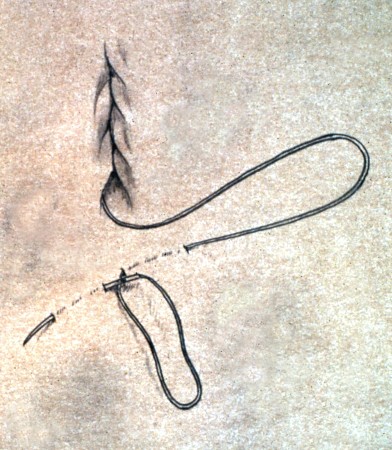
Utrecht Pattern - Continued.
After placement of the first knot, the pattern is begun at a diagonal about 2 cm from the edge of the incision. The needle exits about 0.5 cm from the edge of the incision.
Utrecht (1976)

Utrecht Pattern - 2 Steps Forward / 1 Step Back.
The pattern progresses by 2 steps forward and 1 step backwards as diagrammed.
Utrecht (1976)
Utrecht Pattern - Ending the Incision.
The closure of the incision is ended with another triangle. The apex is where the needle last exited. The needle is essentially re-inserted in the same location, as shown in the illustration.
Utrecht (1976)
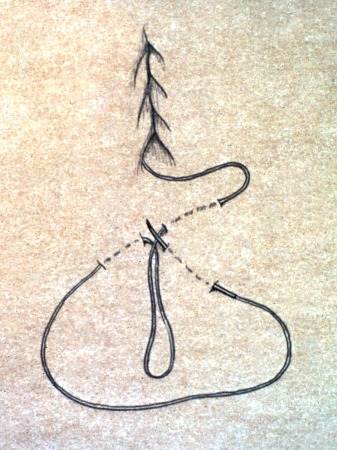
Utrecht Pattern - Final Knot.
The needle end of the suture is tied to the loop left behind at the apex of the triangle.
Utrecht (1976)
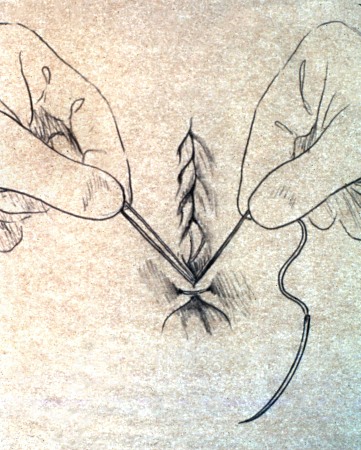
Utrecht Pattern - Final Tie.
By pulling up on both ends of the suture material the base line of the triangle folds in and the knot is buried.
Utrecht (1976)
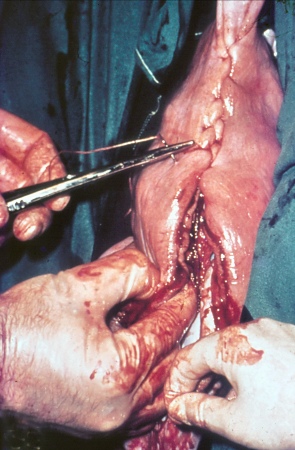
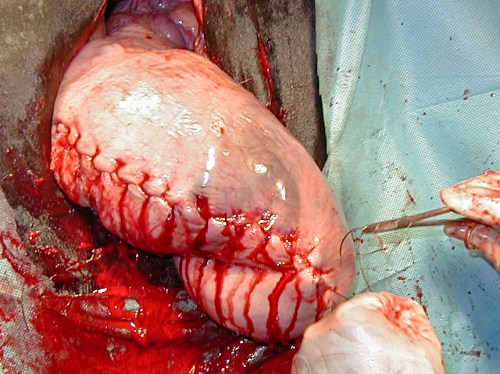
Utrecht Pattern - Actual Uterus.
Suturing in progress. This is a one-layer closure. The cut edges of the incision (where the healing takes place) are closely approximated, and the wide placement of the sutures causes the edges to fold in and seal the incision at the peritoneal surface.
Utrecht (1976)
Utrecht Pattern - Needle Placement.
Same on the opposite side. The needle is not allowed to penetrate into the lumen and set up potential fistulous tracts.
Utrecht (1976)
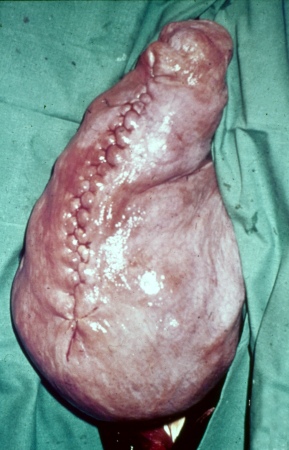
Utrecht Pattern - Completed Closure.
This one-layer pattern is more functional than cosmetic. It is important that all suture material is buried. This minimizes adhesions. Synthetic absorbable #1 suture material is used. Chromic catgut should be avoided.
Utrecht (1976)
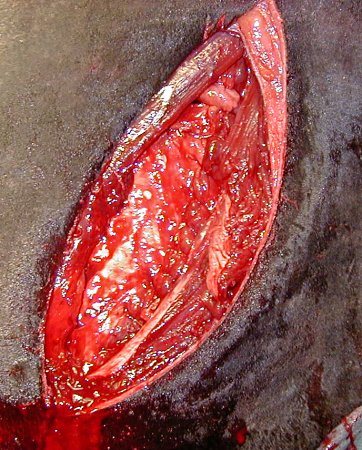
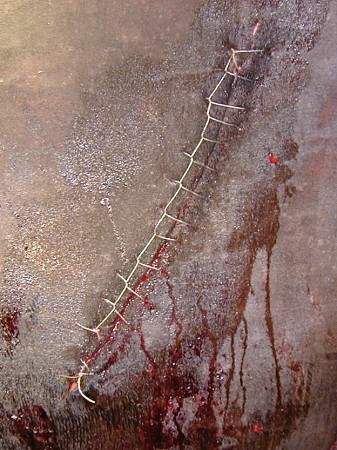
Closing the Flank Incision.
Closure of the abdominal wall is routine, in layers, or by choice of the surgeon.
Utrecht (1976)
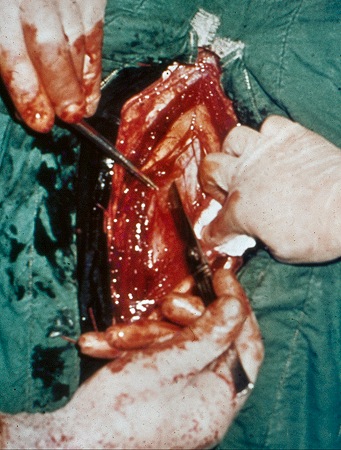
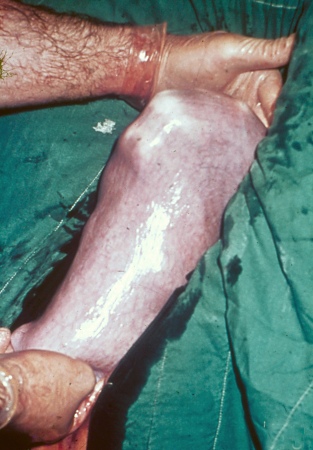
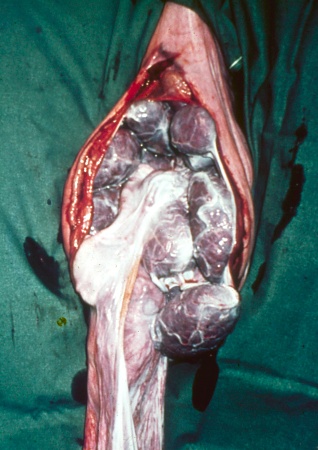
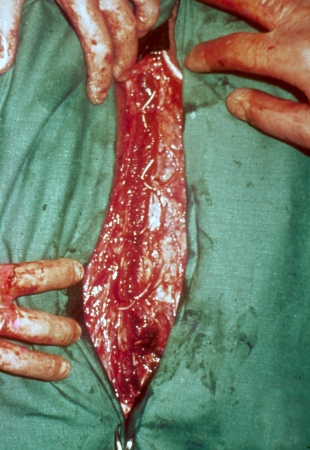
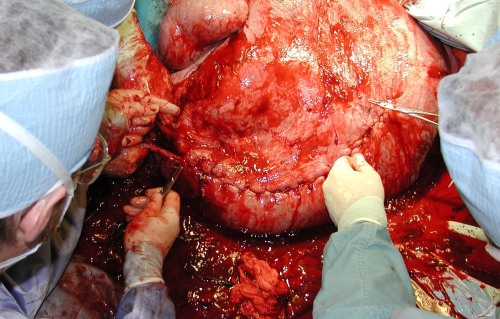
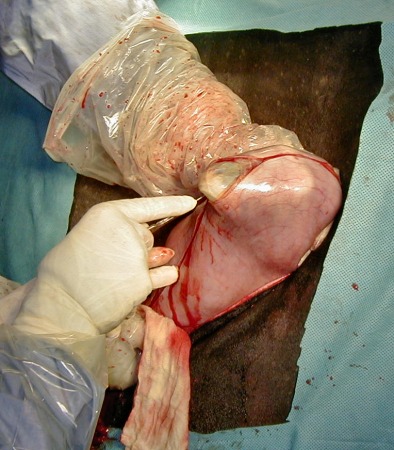
Emphysematous Uterus.
The huge distended uterus should be exteriorized via a midline or paramedian incision to minimize contamination of the abdomen with its foul smelling gas, fluids and decomposing fetus.
Prado TM (2007)
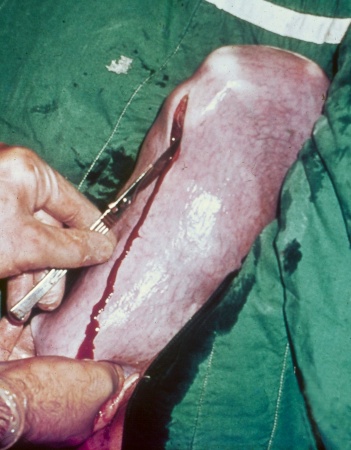
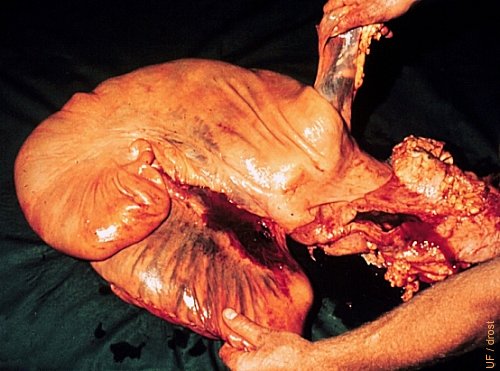
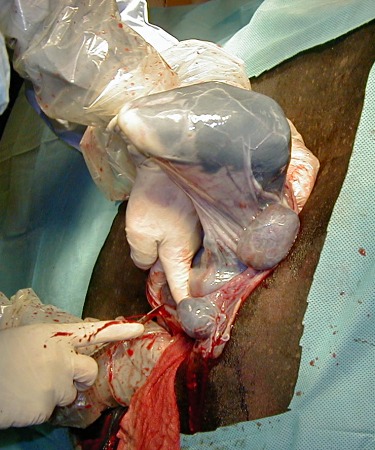
Suturing the Emphysematous Uterus.
Closure of the incision of the uterus of an emphysematous calf after release of its contaminated contents. External lavage of the uterus, with sterile fluids, is important before returning it to the abdomen.
Prado TM (2007)
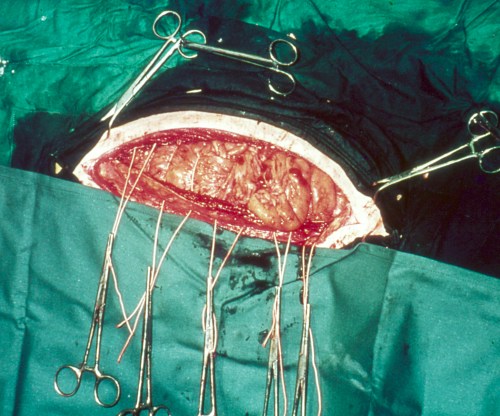
Closing a Midline Incision.
The midline approach is sometimes selected when contents of the uterus are severely contaminated and optimal exposure of the uterus is required, primarily in beef heifers. The large udder in dairy cows make this approach unwieldy if not impossible (vest-over-pants suture pattern).
Drost M (1974)
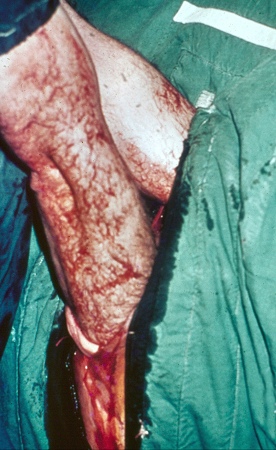
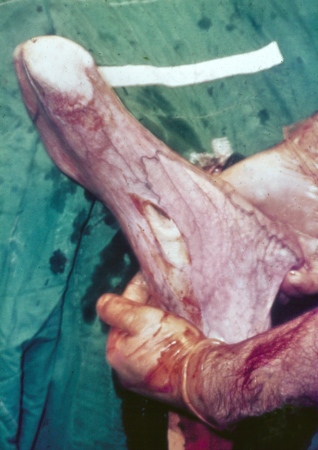
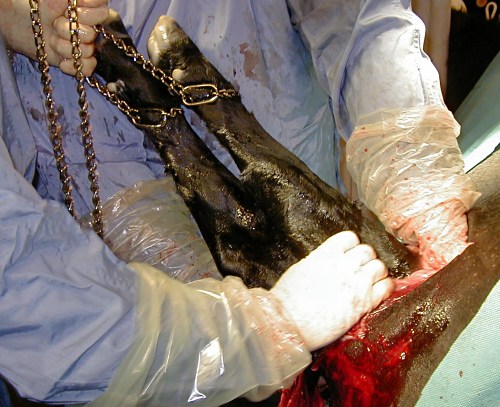
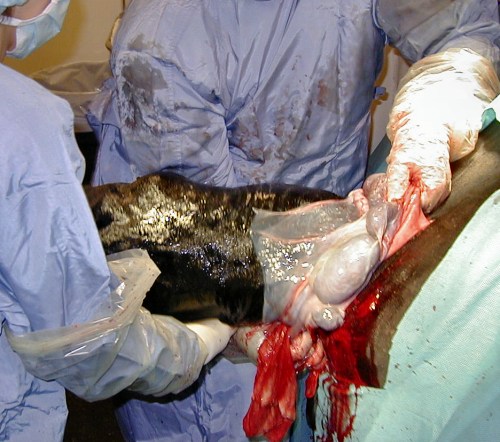
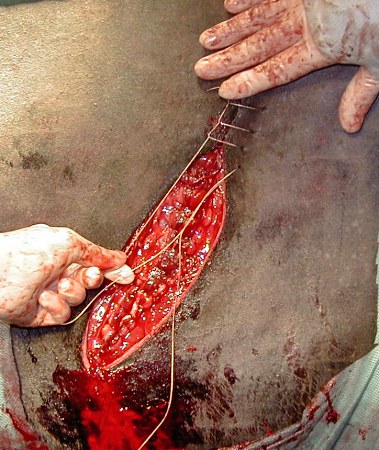
Torn Uterine Artery.
The uterine artery was torn during forceful manipulation of the uterus either before a cesarean section was performed or during manipulation of the uterus for positioning for surgery (history unknown). Note the closed incision at the greater curvature of the right horn and hemorrhage into the broad ligament.
Utrecht (1976)
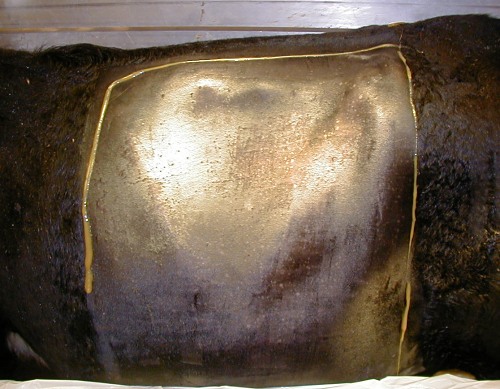
Preparation of Surgical Site.
The left paralumbar fossa is clipped, scrubbed, and disinfected. The approach used here is to scrub from the center area of the site to the periphery, which is subject to contamination.
Prado TM (2007)
Left Flank Approach.
The standing left flank approach is preferred to take advantage of the presence of the rumen to block the prolapse of intestinal loops when the gravid uterus is exposed.
Prado TM (2007)
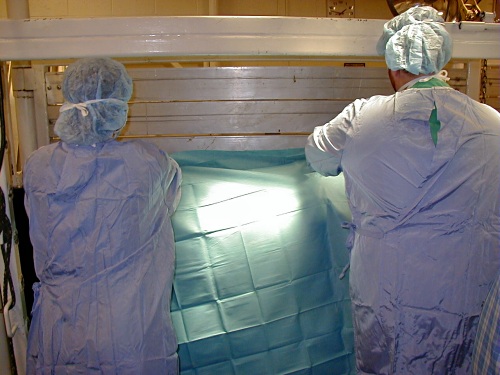
Draping the Surgical Site.
Draping the surgical site can aid in maintaining asepsis but can be problematic in some restless patients, as they move excessively. The drape should be secured well with towel clamps but may still shift and tear.
Prado TM (2007)
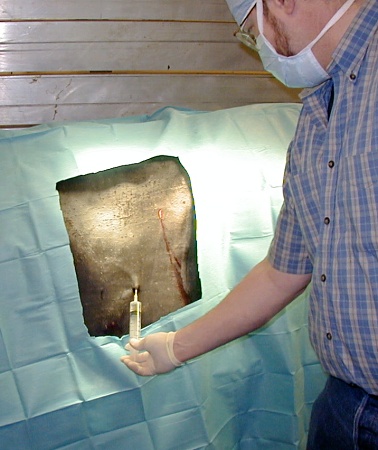
Local Anesthesia.
Local anesthesia is administered via an inverted L-block or via a line block. Lidocaine 2% is injected subcutaneously as well as in the deeper layers. Epidural anesthesia to control straining and movement of the tail is recommended.
Prado TM (2007)
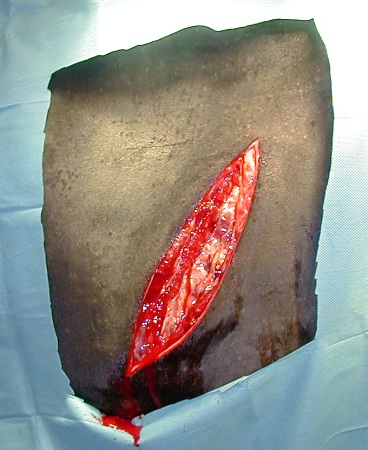
Skin and Muscle Incision.
A 30 to 40 cm incision is made through the skin and the external abdominal oblique muscle.
Prado TM (2007)
Internal Oblique Muscle Exposed.
Exposure of the internal abdominal oblique muscle.
Prado TM (2007)
Internal Oblique Muscle Divided.
The fibers of the internal abdominal oblique muscle are bluntly dissected with the fingers to minimize bleeding and to preserve their integrity and strength upon closure.
Prado TM (2007)
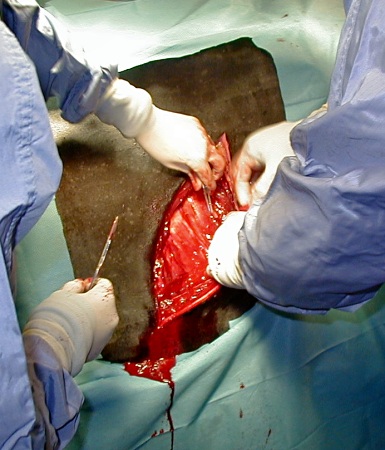
Searching for the Fetus.
After the fibers of the transversus abdominis muscle have been divided, and the peritoneum has been cut, the lower abdomen is searched for the fetus in the uterus.
Prado TM (2007)
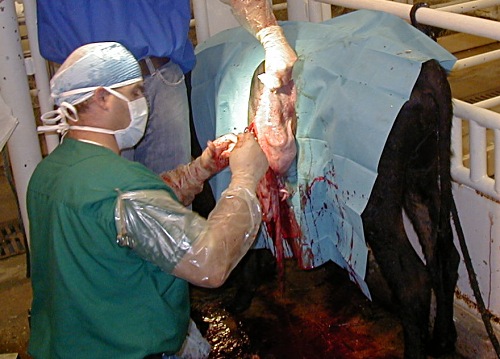
Hindleg First.
Most fetuses are in anterior presentation, hence a hind leg is grasped by the metatarsus to present it in the incision by placing the hock in the lower commissure of the incision and the fetlock in the upper commissure of the incision.
Prado TM (2007)
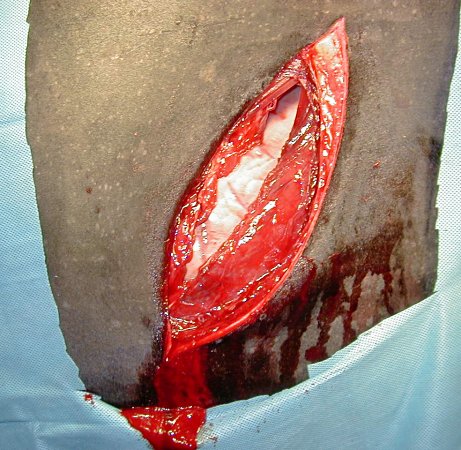
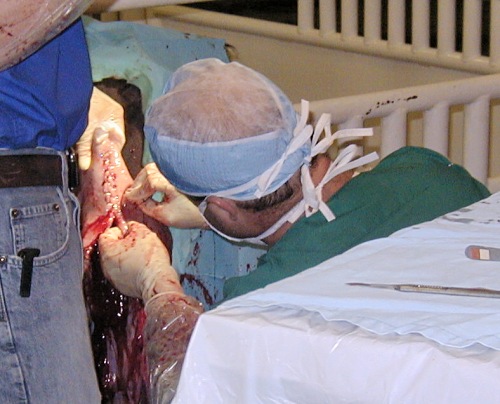
Start of the Uterine Incision.
The uterine incision is started at the claw. Care is taken avoiding placentomes and keeping from cutting into the leg.
Prado TM (2007)
Extending the Uterine Incision.
It is important that the uterine incision is long enough to accommodate extraction of the fetus without tearing.
Prado TM (2007)
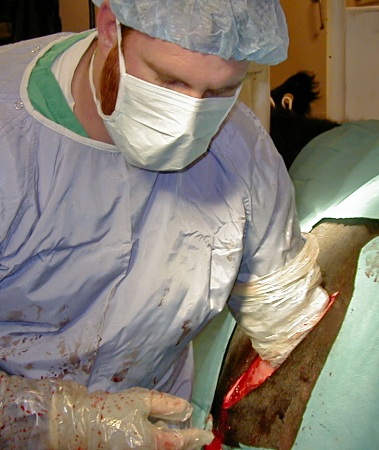
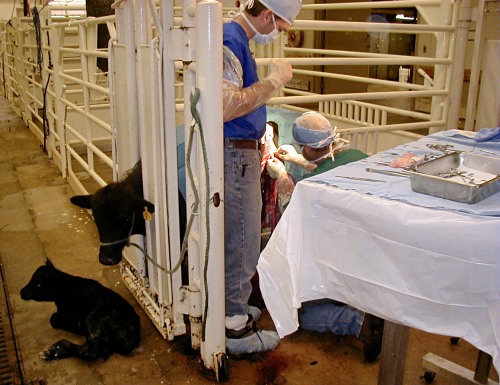
Hindlegs Exteriorized.
Sterile chains may be attached to the exposed (hind) legs, and handed to an assistant for extraction of the calf.
Prado TM (2007)
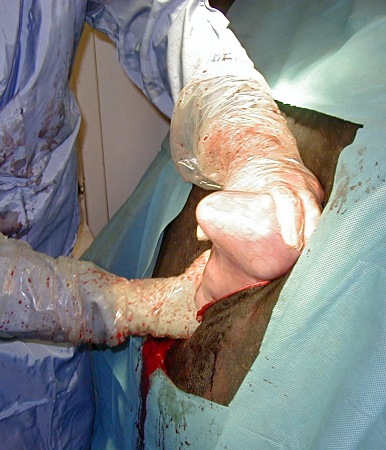
Extraction of the Fetus.
During extraction of the calf its body is supported and a firm grasp is placed on the uterus to keep it from retracting back into the abdomen. This prevents the spilling of its fluids which may be contaminated.
Prado TM (2007)

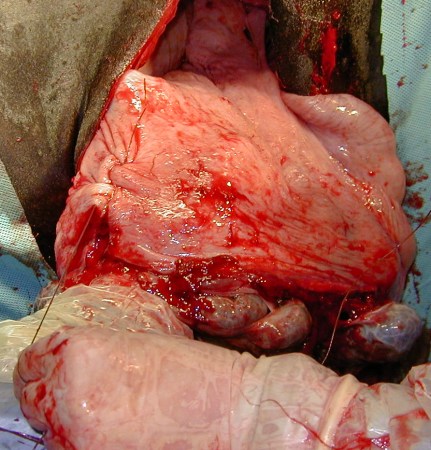
Positioning the Uterus for Suturing.
The uterine incision is lifted up to allow the membranes to fall back into the lumen, while the edges of the incision are aligned, in preparation for closure.
Prado TM (2007)
Suturing the Uterus.
Closure of the uterine incision is with the Utrecht pattern. A large, straight, atraumatic suture needle and # 1 synthetic absorbable suture material are used.
Prado TM (2007)
Modified Cushing Pattern.
The Utrecht pattern is a modified Cushing pattern which simultaneously aligns the cut edges and inverts them for a tight seal.
Prado TM (2007)
Final Uterine Stitch.
The final stitch and knot are buried to avoid adhesions to the mesentery and intestines.
Prado TM (2007)
Closure of the Muscle Layers.
The peritoneum is closed with a simple continuous suture pattern using synthetic absorbable suture. The transversus muscle may be included in some of the bites.
Prado TM (2007)
Lockstitch for the Skin.
Closure of the skin may be done with a lockstitch pattern using nonabsorbable suture.
Prado TM (2007)
Lockstitch Pattern.
Closure completed. Good alignment of the cut edges to promote rapid healing.
Prado TM (2007)
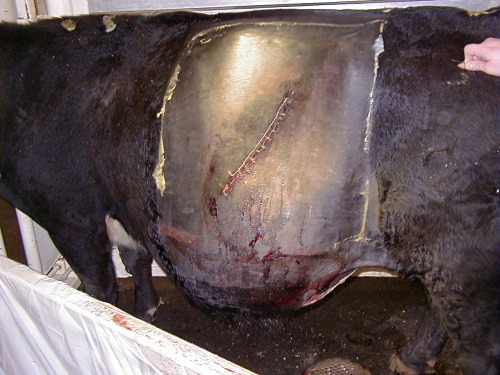
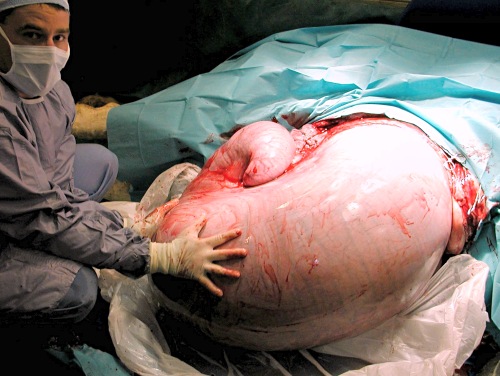
Surgery Completed.
Overview of the closed incision in the left paralumbar fossa.
Prado TM (2007)
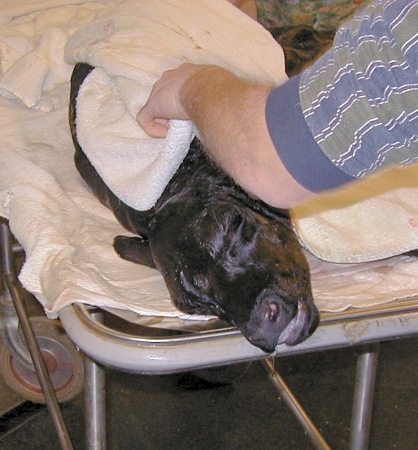
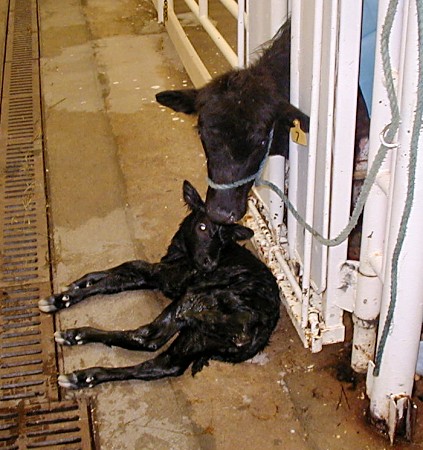
Checking the Calf.
Immediately upon delivery of the fetus it must be checked for initiation of respiration. Rubbing the skin stimulates respiration. The neck should be extended and the tongue pulled forward to clear the airway.
Prado TM (2007)
Dystocia in a Mini Cow.
Fetomaternal disproportion in a miniature cow. Prolonged nonproductive labor.
Prado TM (2007)
Obstetrical Exam of a Mini Cow.
Diagnostic examination to determine the viability of the calf as well as the possibility of an assisted vaginal delivery.
Prado TM (2007)
Traction in a Mini Cow.
Early traction to determine if the shoulders can be brought into the pelvic inlet.
Prado TM (2007)

No Progress in the Delivery in a Mini Cow.
Insufficient progress. The pasterns should be able to be pulled 5 to 10 cm outside the vulva to assure that the shoulders will have entered the pelvic inlet.
Prado TM (2007)
C-section is Indicated in a Mini Cow.
Preparation for cesarean section via the left flank.
Prado TM (2007)
Suturing the Uterus of a Mini Cow.
The uterus is suspended by an assistant to facilitate suturing.
Prado TM (2007)
Closing the Uterus of a Mini Cow.
The uterus is closed with an infolding, double-layer suture pattern.
Prado TM (2007)
Surgeon on His Knees Next to a Mini Cow.
Overview of a live calf and the surgeon on his knees in the process of closing the incisions.
Prado TM (2007)
Live Calf after C-section in a Mini Cow.
A live calf made it all the more worthwhile while saving the mother.
Prado TM (2007)
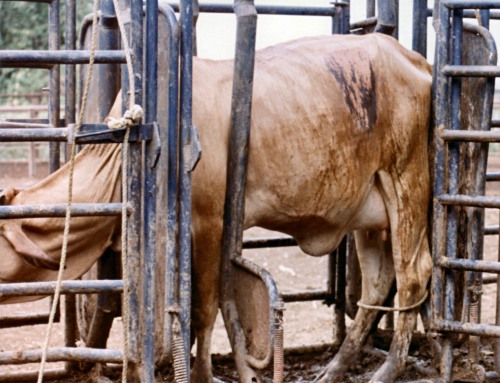
Cesarean section in a Bos Indicus Cow.
Cesarean section in a Bos indicus cow on the farm. Note the restraining ropes around the lower hindlegs to keep the cow from kicking the surgeon.
Prado TM (1983)
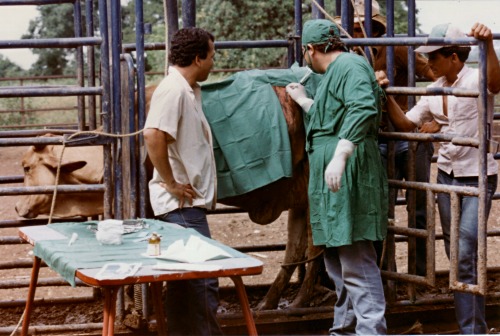
Ready for C-section in a Zebu Cow.
Draping minimizes contamination but can be a problem with a nervous cow that moves. Sedation may be in order. The surgeon is testing the anesthesia with a needle.
Prado TM (1983)
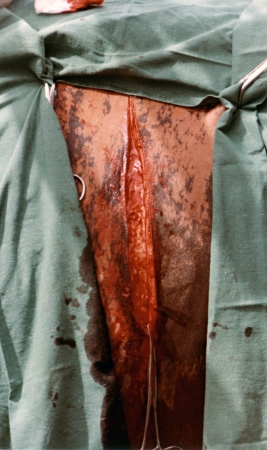
Exposure of the Uterus of a Zebu Cow.
A leg of the fetus, still within the uterus, is exposed.
Prado TM (1983)
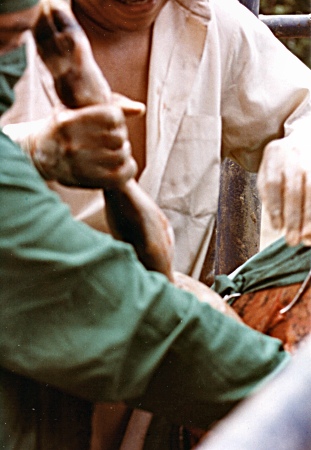
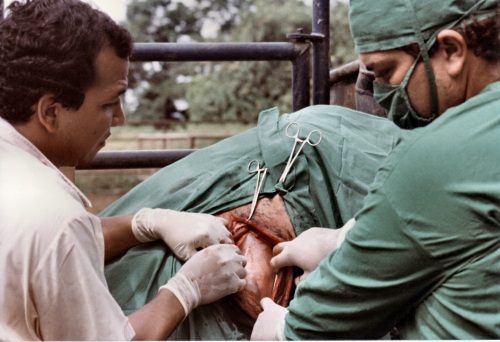
Hindleg of the Calf Exteriorized in a Zebu Cow.
One hindleg is extended while the surgeon reaches for the second foot inside the uterus.
Prado TM (1983)
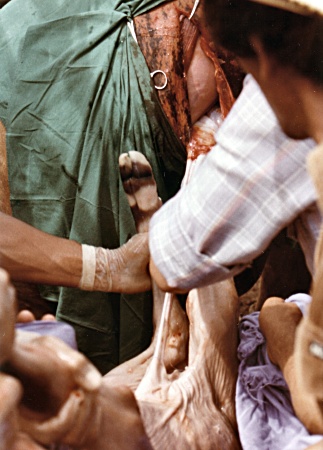
Allantoic Membranes of a Zebu Cow.
The uterus has fallen back into the abdominal cavity, leaving the allantoic membranes hanging out. This is no problem if the uterine contents are not contaminated.
Prado TM (1983)
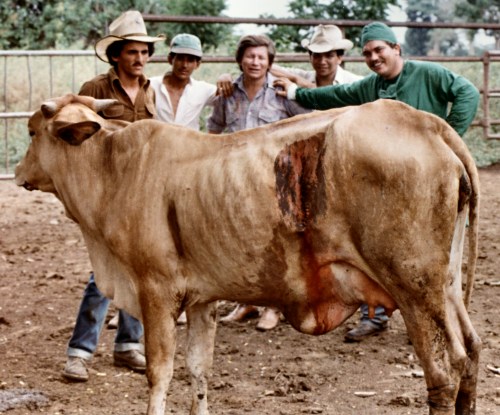
Cesarean Section Completed in a Zebu Cow.
Standing, still sedated, cow after successful surgery in the field.
Prado TM (1983)

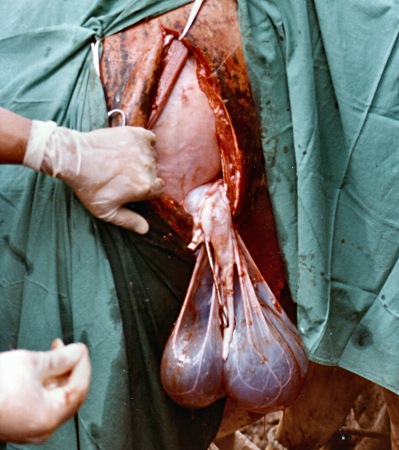
Live Newborn Zebu Calf.
Large, live, newborn Bos indicus calf after cesarean section.
Prado TM (1983)